Basic Formula For NPM Modules Reviews:
For each review post of NPM modules I will be mixing up some big, well known modules with others that may not be so well known to some. All modules reviewed are those which I have personally used. I am not going to review modules which I have not used nor will I review modules which I did not find either to my liking or to be difficult to use due to lack of documentation or just poor implementation. Negative reviews would not be fair in these posts as a great deal is dependent upon the users ability to understand the documentation and how to implement the module within the code. In other words, I would rather concentrate on the positive.
Sometimes more than one module will answer the needs of the implementation required. I have tried to include those as well, but I will concentrate the review on the one that I used. Links to the NPM module are also supplied.
Of course, hopefully, I will get to the famous, most used modules as well as time goes on. If are a NPM Module programmer and would like your module reviewed please fill in the form here.
If you have a suggestion for a module review, just use the regular contact form on the side of the page.
For these five reviews I have picked some fairly easy and useful NPM modules which, if you require their use, will save you time and effort. Some are even a lot of fun to use like Chalk! Hope you enjoy.


Module #1:
To understand the simplistic genius of .dotenv one must first understand the Node.js structure of environment variables. The process structure for Node.js can be read here. The specific aspect of environment variables can be found here.
Adding to the environment variables is an extremely useful and time-saving process in your development process. These variables can be anything you like, however, usually it is common practice to load variables which define such things as database url, port and password requirements and other variables which are required globally in your project.
As you may or may not know in order to access a global environment variable, say with name url_ip, which you already added to the global environment, you would type in your code where you need to access it:
process.env.url_ipThe above will access the environment variable so to send it to the console you would type:
console.log(process.env.url_ip);Along comes .dotenv and makes adding, access and any manipulation on those variables which you require all through your project that much easier.
Here is the simple process:
You create a file, by convention (though actually no need to follow convention with .dotenv, it would be named, “.env”. This file is actually basically a text file, not JavaScript and not JSON. The makeup of this file is as follows:
name of variable = ‘value of variable’
This is one per line. No comma, or semicolon; at the end. An example of such a file follows (which just assumes variables for a MongoDB installation:
url_prefix='mongodb://'
url_ip='@localhost'
port=':27017/'
dbase='Name of Dbase here'
dbUser='UserName'
dbPW='UserPassword'
collectionNames='Mongo Collection Of Names'
collectionBus='Mongo Collection Of Businesses'
EncType='level & type of encryption here'
BaseType='base type of encryption'
Calling the file:
Assume your .env file is in the root directory of your project you would place in your project file as follows nearest the top as possible:
"use strict";
require('dotenv').config();
Now all your added environment variables are available to your project. Simple.
Some Good Practices:
It is easy enough to place your .env file (and even name it to something else) by using the .config method of .dotenv. Assume your partial directory structure is something as follows:
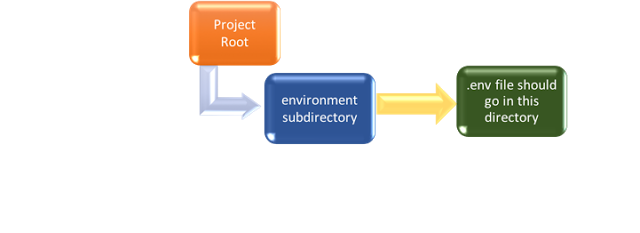
In order to access your .env file the require line would read as follows:
"use strict";
require('dotenv').config({path: './env/.env'});
Additionally, another important practice if you look at the file above and want to put sensitive information like a username and password into the environment file, it would be smart to encrypt (hash them first) and place the hash in the file. Then in your code when you read in the variable, process.env.dbPW, you would use a function to decrypt it. (Something like bCrypt or Cryptr, which I will review at a later date.)
Care must be taken with environment variables as you can change them within your Node.js project, but they will be only available within that project and as it is running. Any variables you add or change will be lost to the overall system and are only local to specific project they are being loaded from.
I strongly recommend reading the FAQ on the .dotenv NPM module page.
Module #2: CHALK

When I came across this I smiled wide and thought it may be a cute toy. It has turned into one of the most useful and oft-used modules in my library of tools for development purposes. As we all know, the console command, in all its permutations, (see Console in Node.js documentation) is one of the most useful tools in the debug tool-box. As you write your code there are a zillion times you will use the
console.log(your-variable or JSON string);to check your variables or messages or error return on a callback.
When these slide by your terminal window you can make life much easier on yourself and your eyes by using colors to mark those statements. Chalk contains quite a few “Modifiers” (e.g. bold, underline, strikethrough etc.), “Colors” and “Background Colors”.
Assume the following commands:
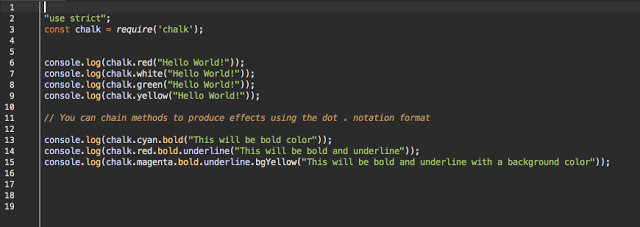
This will produce:
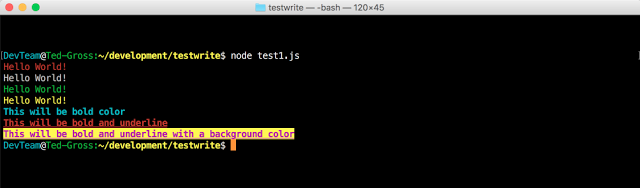
Chalk is incredibly easy to use and I promise you it will make life easier on you to discover the bugs and problems and your eyes, as you no longer need to search through text all colored the same for a specific console.log. It is also great when you work with a team and while debugging you can tell them to look for the blue or red message in the terminal. It really is that simple. The only downside is that you can get carried away!
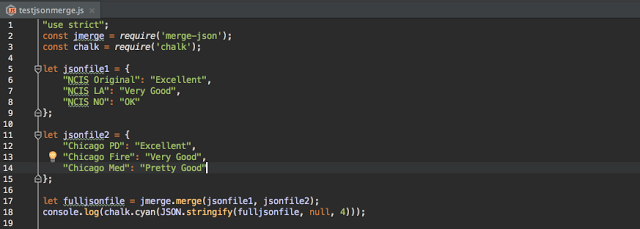
Module #3: merge-json
Before beginning, please note, that merge-json and json-merge are two totally different modules. I do not use json-merge and this is not a review of that module.
As you know, or are finding out, JSON format is incredibly useful and certainly a real part of the entire Node.js system (as well as JavaScript). Of course you have the normal commands such as, JSON.parse and JSON.stringify. Yet even these normative commands are certainly not enough for manipulations of JSON information.
merge-json comes to answer one specific area which actually is incredibly important and useful. You will, I guarantee it, often find yourself with two JSON files which must be merged. This is usually critical especially if you are getting ready to add a document into MongoDB. Maybe you are gathering information from different sources and as you gather it you place it in a JSON object, or perhaps you are in an “app.get” situation where you receive a JSON object. In either case you now have the situation where you have two or more JSON objects which must be merged together before you can do anything with the information. We will just do it about television shows where polls come in to our system.
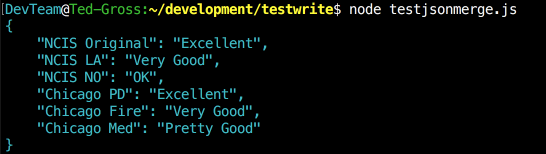
JSON Object 1:
{
    "NCIS Original":"Excellent",
    "NCIS LA":"Very Good",
    "NCIS NO":"OK"
}
JSON Object 2:
{
    "Chicago PD":"Excellent",
    "Chicago Fire":"Very Good",
    "Chicago Med":"Pretty Good"
}
Now we need to combine these two JSON files in order to be able to dump it into a document in a MongoDB collection. This is where json-merge does its simple magic.
The simple test code:
and the output as one JSON file:
If you have more than two files to merge you just continue to merge them two at a time. If I had a third, then it would be simple to just put:
let fulljsonfile = jmerge.merge(jsonfile1, jsonfile2);
fulljsonfile = jmerge.merge(fulljsonfile, jsonfile3);
and so on and so on.
You have other options available in the package as well, however we covered the most important. If you use this as much as I do, you will function it out to return the merged JSON file.
There is another JSON merge package which is also fairly good, with more options in the merge. I really do not need those options however it is a good module as well, so take a look at it: json-merger
Module #4: jsonfile
The next module, jsonfile actually belongs here as a direct continuation of the merge-json module. This allows you to write and read JSON files easily and swiftly. The uses for this module are innumerable, especially in serious Node.js systems. Additionally this module handles both synchronous and asynchronous modes, which is also a big plus if you are dealing with callbacks in your code. For the examples we will just use the both the simple synchronous mode and asynchronous mode.
Let us say you have information coming in to your system and you need it placed into JSON format. There are quite a few methods of saving that information for future use. You can use a cache system in Node (which I will review at a later time), but these have certain limitations, unless you are willing to really study the Node.js implementations. Of course you can use the powerful Redis, however, I have just recently seen an install of Redis for Node which was so just plain idiotic, that I began to wonder why the programmer just did not revert back to his beloved PHP. But that topic will be covered in a later post.
Our information comes in, and we have a JSON object, which will be required later on down the line and perhaps certain keys added, or values will need to be overwritten and updated. Placing it in the cache with a unique key does solve the problem. But what happens if you are passing this information from a Node server to another running process at the same time coming from yet another Node server running in the same system? Or what if you need to guarantee data persistence even after the lights go out for whatever reason? The obvious and most elegant answer here is the file system and being able to read and write those files swiftly without worry about data loss.
So, here is where jsonfile actually does its work. Reading and writing JSON files. Let us just extend our code from before to take our merged JSON and write to a file and then read it back. In the code you will notice I also added yet another JSON which is date and time just to give it a bit more information. (And yet again, we will cover modules which deal with date-time data in a later post, but for the moment we will ignore them.)
Here is the code using CHALK, merge-json & jsonfile.
"use strict";
const jmerge = require('merge-json');
const chalk = require('chalk');
const jfile = require('jsonfile');let jsonfile1 = {
    "NCIS Original": "Excellent",
    "NCIS LA": "Very Good",
    "NCIS NO": "OK"
};let jsonfile2 = {
    "Chicago PD": "Excellent",
    "Chicago Fire": "Very Good",
    "Chicago Med": "Pretty Good"
};
let fulljsonfile = jmerge.merge(jsonfile1, jsonfile2);// create Json here for this though you could just put the code in the merge directly as follows:
// fulljsonfile = jmerge.merge(fulljsonfile, {"Date": new Date().toString().split(' ').join(' ')});let datejson = {"Date": new Date().toString().split(' ').join(' ')};
fulljsonfile = jmerge.merge(fulljsonfile, datejson);// now write it to a file
let xFile = 'data.json';
jfile.writeFile(xFile, fulljsonfile);// now read the file and show the results
jfile.readFile(xFile, function (err, obj) {
    console.log(chalk.cyan.bold(JSON.stringify(obj, null, 4)));
    console.log(chalk.blue('Error: ' + err));
});
The code is simple, and the writing and reading comes at the end. We take our JSON created by merging, add a date, and merge that, then write it to data.json.
Our data.json file is written. (Obviously in a real environment you would create a different directory off the root of your project to hold any files you write there and you would give it a unique name based either upon a UUID or some other unique information so that you can retrieve it in your code at any time. Remember, you will probably be saving quite a few files and you will need to be able to retrieve the right one for your needs.)
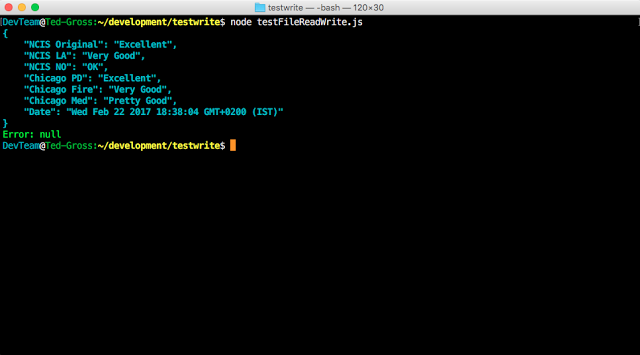
Finally, we show the code output, in a prettified JSON format, (this is what JSON.stringify(obj, null, 4) actually does. In another post I will show you a few modules that do this better but for now remember, we are concentrating on these modules.
Any time you need this information and it is no longer in memory for whatever reason, you can simply read it, manipulate or use the data, and then send it on its way again. As an aside you can have required the Node.js file system and delete the file when you no longer need it — require the filesystem of Node.js, and then:
fs: require('fs');
//code goes here
fs.unlinkSync('data.json');
Module #5: underscore.string
Any programmer who is even slightly familiar with JavaScript knows that dealing with strings and dates can often be a nightmare. It always seems a lot more complicated than it really should be. Date and time we will deal with in another post. When it comes to string manipulation and arrays underscore.string is excellent. Before you scream at me about Lodash, I promise you I am not ignoring it. Lodash is incredible if not somewhat finicky, and again it will be dealt with in another post. underscore.string though does its job so well though, it is well worth looking into and making use of, if you need it and you can use both Lodash and underscore.string together.
underscore.string has so many functions it would be difficult to cover them here. Some are useful under any situation, others you may need only once or twice or not at all. When you are dealing with text or numbers some of these functions are really useful. Just a simple one like clean, which simply takes a string and gets rid of multiple spaces between words is invaluable. Formatting numbers with periods or commas is just a one step process. Below is the code and results showing 3 of the methods available. (There are many, many more.) My favorite actually is the method “toSentence”.
"use strict";
const uscore = require('underscore.string');
const chalk = require('chalk');let x1 = "Javascript    lacks complete    string     manipulation   operations.";
let x2 = ["Excellent", "Great", "Very Good", "Good", "Fair", "Poor"];console.log(" ");
console.log(chalk.red.bold("Using Method clean"));
let z1 = uscore.clean(x1);
console.log(chalk.white.bold("Exact String: " + x1));
console.log(chalk.cyan.bold("Cleaned Text: " + z1));console.log(" ");
console.log(chalk.red.bold("Using Method numberFormat"));
console.log(chalk.white.bold("The following Number 100700 will be converted"));
console.log(chalk.yellow.bold(uscore.numberFormat(100700, 2)));console.log(" ");
console.log(chalk.red.bold("Using Method toSentence"));
console.log(chalk.white.bold(uscore.toSentence(x2)));
console.log(chalk.yellow.bold(uscore.toSentence(x2, ", ", " or ")));
And the results:
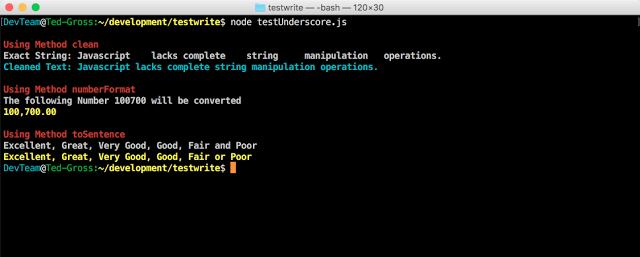
As you can see if you deal with text or numbers methods like this become incredibly useful. You soon may find you have no idea how you lived without it.
Take a look @ underscore.string and also take a look at the extended website. Underscore.string is one of those modules which has excellent, readable documentation.
Well that is about it this time around. Drop a comment or a like if you found this one useful. Among other articles on Node.js, I do hope to write quite a few reviews.
About the Author: Ted Gross served as a CTO for many years with an expertise in database technology, Node.js, PHP and OOP. He has expertise in Virtual World Technologies & Augmented Reality. He has also published many articles on technological topics especially on Big Data & Chaos Theory (in professional journals and online @ Medium & LinkedIn). He is also an author of literary fiction, children’s books and various non-fiction articles. His short story collection, “Ancient Tales, Modern Legends” has received excellent reviews.
Take a look @ Ted’s blog: Drilling Into Node.js
Ted can be reached via email: allnodenpm@gmail.com; Twitter (@tedwgross); LinkedIn; Medium